
As we’ve been progressing down the path of your digital project discovery, the outcomes have been getting more and more tangible. We went from a high-level project brief to some general user personas to user stories that support the brief and the personas to acceptance criteria that – when used in conjunction with user stories – start to paint a pretty clear picture of what we’re actually building. In some vein, we have outlined the pieces of the puzzle.
Now, we start to put those pieces together – specifically via the creation of Information Architecture (iA) and User Journeys.
What is Information Architecture?
Information architecture is a somewhat nebulous term that, depending on the specific field it’s being applied to, can carry different connotations. We’re talking about the discovery phase for a piece of software – such as a web app or a mobile app – so let’s think of information architecture like this:
The art and science of organizing and labeling websites, intranets, online communities, and software to support findability and usability.
(source)
When we put on our iA hats, we start thinking about the structure of the software we’re building. For example, should there be an About page on your website? Should it be called “About”, or maybe “Our Team”? What should the URL structure look like? What about all of our product guides – where should those exist in the architecture? Should they be in a section called Guides, or perhaps Resources? Or maybe they should only exist on their related product pages? Should they be categorized? If so, how?
The creation of a software’s Information Architecture needs to take in to account a variety of different considerations – a non-exhaustive list will include considerations around:
- User personas. First and foremost, does the iA support the identified users’ goals, contexts, habits etc? Will it be intuitive and logical for them?
- User stories. Does the structure account for and complement the user stories we defined?
- KPIs. Does the architecture support the KPIs we outlined in the project brief?
- Common patterns. Does the iA support common application architecture patterns and labels? If not, is there an intentional and beneficial reason why?
- Search. Does the architecture support what we know about search indexing, discovery, and ranking when it comes to SEO?
Of course, there are a variety of methods to actually mapping out Information Architecture for a new piece of software. Sometimes, it’s as straightforward as a member of the project team – UX designer, Information Architect, etc – sitting down with a subject matter expert and working with pencil and paper, or collaborating on a spreadsheet. For larger projects that have the budget, card sorting is a popular exercise worth reading about too.
How Should We Deliver Information Architecture
Of course, the end state of information architecture work is manifested in the application that we’re building. But in the planning and discovery stages – which we’re in now – we suggest delivering information architecture in two forms:
- A detailed spreadsheet. This is the best method for capturing all the data that needs to go into proper iA. Luckily, we’ve made our spreadsheet available for you to download for free, just below.
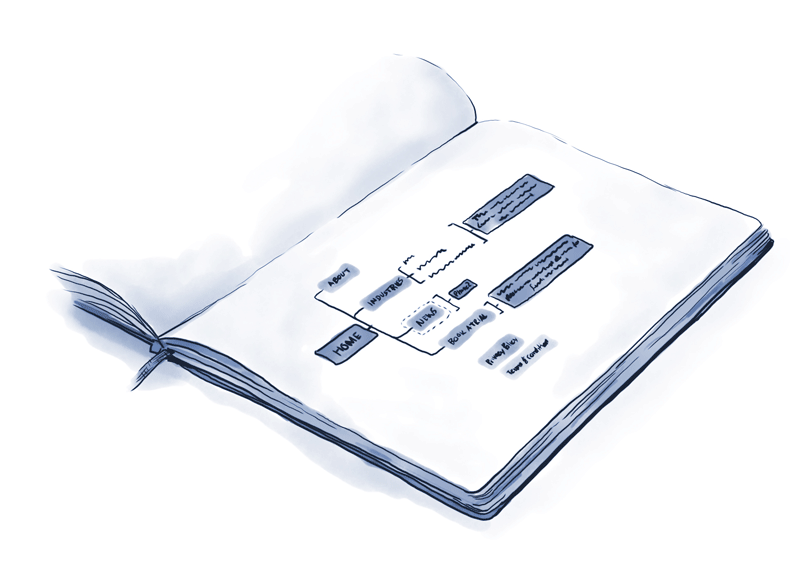
- A simplified visual version. Sometimes we find the detailed spreadsheet can be a little too much information for some people to parse. Thus, a simplified visual version – which can be whipped up using XMind, or Adobe Illustrator, or even just with pencil and paper – showing pages, posts, and their hierarchical relationship to one another often is a great supplementary piece to the detailed spreadsheet.
Get The Free Information Architecture Template!
Mapping out the iA of your software in this manner really starts to shape the scope of what needs to be built. Of course, we’re referencing all of the work we’ve done to date – briefs, personas, and user stories – to ensure we’re on track.
Remember that the work done to date is not set in stone. It can and should be reviewed and improved at each step of the journey. So, if in the creation of your iA you uncover a few more user stories, then by all means – capture them! All of these steps in a digital project discovery should be iterative. So keep that in mind when we discuss iA’s companion piece – user journeys – next.
What are User Journeys?
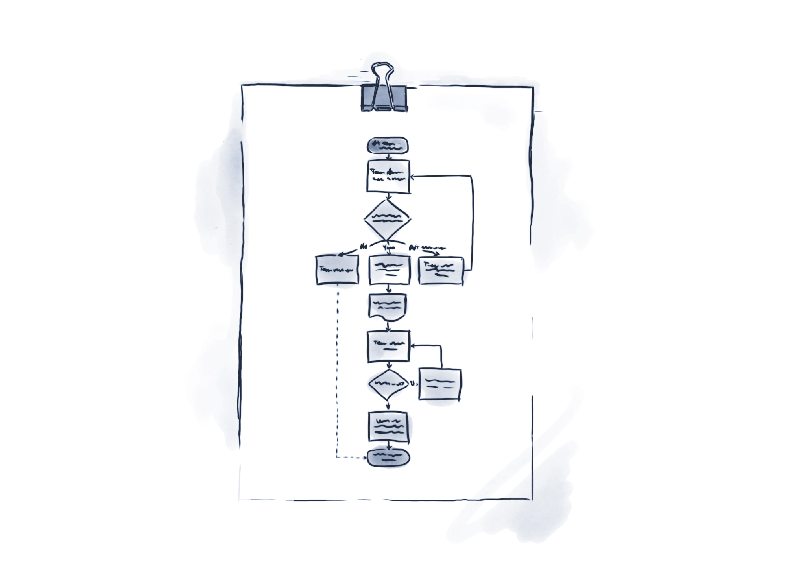
We can think of user journeys as the paths our end users will take to meet their objectives – quite literally, the series of steps a user will take through the screens of the app we’re building. For example, a user journey for a user story around a software trial sign-up might look like this:
- User downloads mobile application to their device
- User is prompted upon opening the app to login or create a profile
- User selects “Create a Profile”
- User enters email, personal information, and a password
- User accepts Terms and Conditions
- User is redirected to account settings screen
And guess what? You got it: these can and should come directly from the user stories generated earlier in the project discovery phase. We can look back through our user stories, identify stories related to front-end users, and create user journeys from these stories. Because of the work we’ve done to date defining and prioritizing user stories, we can be confident we’re focused on the right items. Because of the acceptance criteria, we know what key functionality some of these identified pages/posts need to have. Because of the information architecture, we can map the paths users take to actual screens in the application itself. And because of the user journey exercise, we can identify efficiencies and work towards an overall high-quality user experience.
It’s important to underscore the point about iteration we made earlier. User journeys need to happen in conjunction with information architecture. Some will choose to tackle user journeys prior to information architecture, which is totally fine. The key point is that none of these items or pieces should be thought of as “final”; the work doesn’t exist in a silo. They are drafts, and whomever is doing the work needs to have the autonomy to update and revise both of these deliverables – and past deliverables too, like user stories. For instance, mapping out a user journey will often uncover missing screens in application architecture. Embrace the user-centered iterative model and don’t be afraid to make revisions. And if you do make changes, make sure to communicate and / or log them somewhere.
The Format and Delivery of User Journeys
I’ve seen user journeys called a million different things (workflows, journey maps, experience maps, workflow processes, etc), and be delivered in a huge variety of formats, from beautiful illustrations to text-based boxes to circular diagrams and so on. It doesn’t really matter what format they come in, so long as they are related and cross-referenced with the iA and ultimately useful and implementable.
Personally? Pick the method that’s the most efficient. If you are a talented illustrator and you can crank out illustrated user journeys super fast, then illustrate them. If you’re a total illustration hack, don’t feel bad – maybe pick a less artistic and more pragmatic method instead.
That said, here are a few recommendations:
- Make sure your iA document has numerical sequencing, aka page or view IDs. E.g. the Home screen is 001, the Dashboard is 002, and so forth. This is a simple way to cross reference user flows to iA.
- If you’ve entered your user stories into a spreadsheet (which we recommended in the user stories article), make sure each has a numerical ID (e.g. US001, US002).
- Start user journeys with a paper and pencil. Draw a circle with the user story ID and perhaps a short description or title (e.g. “Software trial sign up”). Then draw a box next to it and write in the step for first action or screen, and make sure you have the page/view ID in that box. Then do the same for the next step, and the next step, and so on until the journey is completed – just like the illustrated example above.
Why start with paper and pencil? Because you’re sure to create a few non-ideal workflows before settling on the right one. You’re sure to uncover new views that need to be implemented in the iA, which might change the numerical IDs. Basically, you’re going to be making changes – you’re going to be iterating. So make sure you use a pencil like you learned in grade school.
Once you’re satisfied with the user journeys – and yes, ideally this isn’t a one-person job and we’re involving the user associated with the journey you’re mapping out – consolidate them. That might mean opening up software like Illustrator, or Sketchy, or Gliffy, or Vizio. It might just mean re-drawing them a little more legibly. Whatever the case, get them into a usable state so the development and design team can make prototypes based on them.
If your user journeys ended up necessitating changes to user stories, acceptance criteria, or information architecture, make sure to reflect those changes to those deliverables so everything is up-to-date.
What’s Next
At this point, you have a pretty solid understanding of your needs, your users, and your project overall. Most agencies or internal teams will take all the work done to date and estimate on the work – if they’ve not already – and begin the next phase (which is the actual production cycle, which we dub Design & Build). However, if you want to take it one step further, let’s talk about prototyping.