
We all know the importance of having a solid online portfolio. It’s relatively simple to show the work we’ve developed for the screen on our website – after all, that’s how it was meant to be seen. But what about printed material? As designers, we have two options for showing our printed material on our websites: a) mockups, or b) photos of the finished product.
I’m going to assume that most designers reading this article are comfortable enough with the Creative Suite to whip up a decent mockup of a printed piece . So, for this article, I’m going to walk through how to take professional photos of your printed design work, using only a camera and a white sheet of paper. Here’s the shot we’ll end up with (printed pieces will vary, of course!):

Hit the jump for the tutorial!
One big plus of showing photos of printed work is that it shows the client you can not only design, but carry the whole project through to the end. This includes supplying proper files to the printer. Sometimes, it can be difficult to get a copy or two of your printed projects if your clients are the ones picking them up, and thus we have to resort to mockups. However, let’s assume you have a couple copies of a printed project you want to photograph for your website. Here’s how!
1. GET A CAMERA
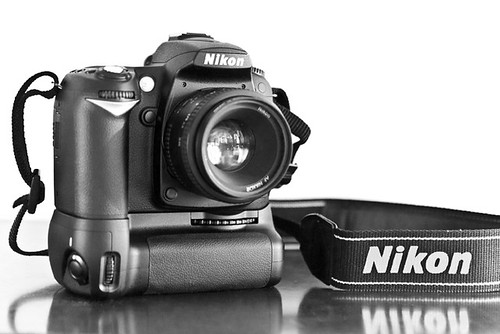
As a photographer, I recommend digital SLRs if you have one/can afford one. The photo quality is much better, and you have control over your photos. However, a point-and-shoot will work too – they’ve come a long way! Here’s what I use, and what I’ll be using for this tutorial:
2. PICK THE PRINT PIECE
So you have your camera ready to go – so go grab your print piece. For this tutorial, I’ll be using my Paper Leaf business card. However, you can choose whatever you want – poster, business card, postcard, whatever. Just keep in mind you need to have enough space to shoot the work, so if you choose a humongous poster, you need a humongous shooting space.
3. CHOOSE A BACKGROUND/LOCATION
Alright. We have our camera and print piece. Now we need to find a background or location to photograph the work. I find it best to choose a neutral background that will work for a variety of print pieces – this way your portfolio will have a unified look. For this tutorial, let’s use a white 11″ by 17″ sheet of paper.
Location-wise, choose a room in your house that’s well-lit by natural light. Lots of windows. Place your sheet of paper in a place that is not being hit directly by sunlight. The goal here is to have soft, even light. This will ensure there are no harsh shadows on your work or background. I chose the spot right next to my workstation for my shot. Soft light from the windows in the room, convenient, and just enough space.
4. SET UP YOUR BACKGROUND
There’s a couple of ways you can set up your background. If you plan on shooting top-down (bird’s eye view), you can just lay the paper flat. If you’re unsure, tape one end of the paper up against the wall and make a slight curve. Tape the other end down to your desk/floor/surface and BAM! you have a seamless background. Here’s my set-up shot – you don’t need to have a studio:

5. SET UP YOUR PRINT PIECE
Now that your background is set up, place your print work in a way that is visually interesting and shows everything you need it to show. Feel free to experiment with the space – for example, I rolled up a piece of Scotch tape, stuck it on the back and folded it in half. This allowed me to prop up the card as opposed to laying it flat.

6. TAKE THE SHOT
Here’s the tricky part: taking the shot. Depending on how even your light is, you may or may not need the flash. If you’re shooting on white, I’d recommend the flash as it’ll ensure enough light hits to make sure the white seamless background is actually white. You can see what I mean – below is a shot I took with no flash, compared to the shot with flash. The shadows aren’t harsh, but the light isn’t even.

If you’re shooting with a point-and-shoot:
- choose a suitable creative mode, or intelligent Auto or whathaveyou. Experiment.
- turn on the Macro setting if you have it and get nice and close.
- turn on the forced flash setting if your flash isn’t firing.
If you’re shooting with a DSLR:
- if you’re not comfortable with your camera, set it to auto and follow the steps above.
- if you’re semi-comfortable, set it to aperture-priority and ensure you have enough depth of focus (f5+, depending on how close you are).
- If you’re super-comfortable and shooting on manual, you’re probably wondering why you’re reading this.
Tips for shooting:
- Fill the frame!
- Experiment with your vertical space. Shoot high, medium and low.
7. REVIEW YOUR SHOT
Some things to look for when you’re reviewing your shot:
- Color: are the whites in the shot actually white? Are they grey, or do they have a yellow or blue tint? Are the colors correct? If not, adjust your white balance and reshoot, or fix in Photoshop.
- Focus: are the important elements in focus?
- Lighting: do you have nice, even lighting? Any harsh shadows? If you do have harsh shadows, review your light source and reshoot.
8. EDIT AND POST!
Since we’re all Creative Suite nerds, I imagine most of you will bring the shot into a post-processing suite like Photoshop. That’s what I did! I made some basic edits: contrast, sharpness etc. Nothing major. I won’t go into detail as to how to edit, as photo editing is a whole other can of worms. To be overly brief, just make sure your shot is sharp and color correct! Don’t turn the photo of your work into an art piece – it’s meant to display artwork, not BE artwork.
There you go! Now head off and shoot your print pieces! If you enjoyed this article, please share and subscribe to the RSS feed!