Wondering what your options are for funding your app idea? What about monetizing it? From various funding models to the most common monetization strategies, the Guide to Funding & Monetizing Your App has the answers you're looking for.
7 Ways to Make WordPress an Even Better CMS
BusinessWordPress is blowing up, as the kids say, these days. It’s no wonder; the open-source authoring platform is super-powerful, flexible and – most importantly – customizable. We use WordPress here at Paper Leaf to power our client sites, and we use it on our own blog of course. The more we use the platform, the more we learn about it. Just like anything, you pick up little tips and tricks to make the experience get better each time.
With that in mind, I’ve compiled 7 tools/plugins/tips we use on the regular when it comes to implementing WordPress as a content management system (CMS). If you have experience using WordPress and are looking for a few little tweaks to maximize your clients’ experience with it, look no further!
Custom Admin Branding
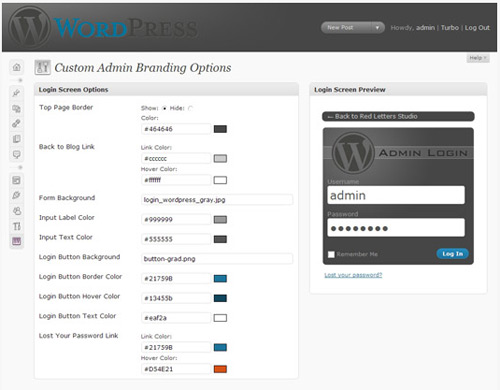
Let’s start at the beginning of your client’s user experience: the WordPress log-in screen. You can stick with the tried-and-tested WordPress-branded log-in and admin screens – but if your client is a small business or service, why not custom brand it for them? It looks slick, your clients will love it, it lets them know they’re in the right place, and it’s super easy to do with the Custom Admin Branding plugin.
This (stable) plugin has a very simple user interface to adjust colors and such; but the best part is that it comes with a PSD template so you can make sure your client’s logo won’t be cut off, etc. Follow the simple steps provided by the plugin author after you activate Custom Admin Branding, and you’ll have custom log-in and admin screens for your client in no time.
Adminimize
So your clients have logged in to through their custom-branded log-in page. Now they’re at their custom-branded Dashboard. While WordPress is well-known for its ease-of-use, it can still be a little intimidating for your not-so-tech-savvy clients. Plus, there are areas that are much better left untouched by the non-tech-savvy – areas like Appearance, Settings, Plugins, even Posts if there’s no Post functionality being used in the website. A very simple way to remove some/any/all of these features is by using the Adminimize plugin.
This (stable) plugin is really quite robust; a basic row/column system allows the administrator (you, preferably) to show/hide elements of the WordPress admin side. The best part: it’s role-specific. What I mean by this is that you can allow “Editors” to see one set of elements, “Authors” to see another, and so forth. This is great for small businesses who might have multiple people handling content on their website – they can be given a login and a role that only allows them to see – and thus edit – elements of the website that the administrator deems fit. Pretty slick for a plugin, I’d say.
Hit the jump for the rest of the post!
Custom Fields
Custom Fields are where it’s at. This little bit of functionality genius, located under the main content editor on any page/post window in WordPress, allows any sort of content to be added anywhere within a page or a post by a user. When we’re talking a CMS, this means us web designers can provide simple, multiple editable regions on a single page to our clients.
For example, say you have a layout that has a banner image top left, a live-text headline top right, and page text below. The main page text can be controlled with the main WordPress post/page editor, as per usual. But with Custom Fields, you can assign a key called “banner” and a key called “headline”. Provided your code is correct, your clients can put the URL to the image they want to use in the “banner” section in the value field, and the text they want in the headline in the “headline” value field. Hit update, and you’re good to go. Have a look at the images below for a visual example.


On the code side of things, you just have to make the custom field data show up in the proper place by using this hook:
<?php get_post_meta($post_id, $key, $single);?>
Where $key is the name (“banner” or “headline”, in our example). This will insert the code you have in the value field, so if you want an image to show up, you need to wrap the hook in the proper HTML tag. If you want to put in styled text, you need to wrap the hook in the proper HTML tag as well (H2, em, whatever you want). Hopefully that makes sense! If not, read the WordPress Codex section on Custom Fields.
This is a fairly basic use of Custom Fields, but chances are it’ll be all that’s needed for most of your clients. If you want to see a pretty crazy example of the power of custom fields in WordPress, check out Chris Coyier’s screencast about advanced uses for custom fields over on CSS-tricks.com.
Dashboard Widget Tip
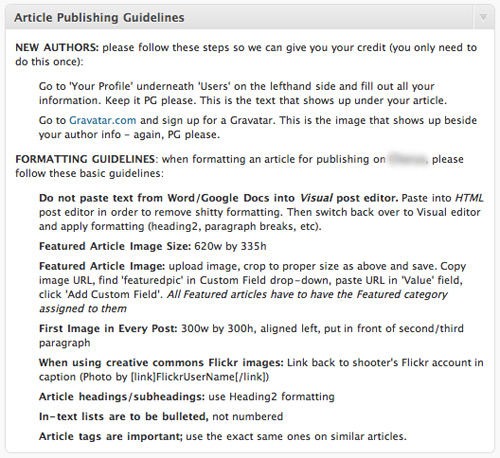
So now your clients have multiple editable regions on their website, thanks to your newfound status as Custom Field Ninja. However, there are always a few rules to be followed by the client to make sure they don’t break the website, or make it look like your 13-year-old niece’s MySpace page – for example, rules like “Use Heading2 for all headings in Pages” or “Slider images must be 600px high by 300px wide”, etc. You could send these guidelines in an email and hope that your client doesn’t lose/delete it, and that your client forwards it to all parties who might be editing website content. However, that’s a somewhat risky – and passive – way of handling this issue. So how can we make this information constantly, easily accessible?
Simple. Put it right where they need to see it – when they log in to their admin end, right smack dab in their Dashboard. How? By making a custom Dashboard widget.

It’s really quite easy – the code can be found in the WordPress Codex, and you just put it in your theme’s function.php file. Here’s the code (note: make sure all quotations are single – apostrophe style!):
// Create the function to output the contents of our Dashboard Widget
function example_dashboard_widget_function() {
// Display whatever it is you want to show
echo ‘When authoring content to ABCCompany.com, please follow these guidelines:’;
echo ‘<ul><li>No LOLCat photos</li><ul>’;}
// Create the function use in the action hook
function example_add_dashboard_widgets() {
wp_add_dashboard_widget(‘example_dashboard_widget’, ‘Name of Dashboard Widget: ie. ABCCompany Website Authoring Guidelines‘, ‘example_dashboard_widget_function’);
}// Hook into the ‘wp_dashboard_setup’ action to register our other functions
add_action(‘wp_dashboard_setup’, ‘example_add_dashboard_widgets’ );
Scan through the code for where to put the title of the dashboard widget (“ABCCompany Website Guidelines”) and the content of the widget (just above that). You can use HTML styling – unordered lists, anchor tags etc – and with this, you have a super simple rules & guidelines widget your clients will see when they log in.
Be careful with this though; make sure you have a backup or way to undo your changes, because screwing up your functions file screws up your site.
There is also a way to force this to the top of the Dashboard, above all other widgets. To read how to do this, and learn more, check out the WordPress Codex on this function.
WordPress Gallery Function
Clients looove photo galleries (dependent on the field they’re in, of course). They’re great for a variety of areas: showcasing work, showcasing product, showcasing a space etc. Luckily for us, WordPress has had a gallery function since 2.5. I know! We just recently found out about it too.
The gallery function is simple to implement, which means your clients can manage their own galleries once you show them how. Here’s the breakdown: upload a series of images to a page/post via the Media uploader. Save all the images, and they show up in the Media Viewer under a “gallery” tab. Click on that link, and you have a few options for your gallery (amount of columns, etc). Click “Insert Gallery” and BAM! you have a gallery on your page/post.

Now, I should mention: customization of the gallery is very limited (read: nonexistent) unless you want to hack around, which I don’t. The gallery outputs thumbnails that are 150X150 I believe, and they look good. As well, some people have raised a stink that the code that the gallery puts out isn’t valid – I personally don’t really care, since the code works in all browsers and I’m sure it’ll be fixed in a future iteration of WordPress.
Now that that’s out of the way, let’s make that gallery you just made shine with the next tip: the ShadowBox JS plugin.
ShadowBox JS
The basic gallery you just made in WordPress is fine, but it opens the image in the window/in a new window – not as great-looking as it could be. This is where ShadowBox JS comes in. This plugin, which plays nice with others, will auto-magically turn your WordPress gallery into a javascript-powered gallery, showcasing the full image in an JS image overlay (the same, very popular method you see everywhere). All you have to do is download the plugin, activate it, and check the settings to make sure everything’s the way you want it.

An extra awesome feature of Shadowbox is that it also has the functionality to play movies & mp3s in the same fashion.
Please do note: since this post is about WordPress as a CMS, I imagine most of you who go on to use ShadowBox JS will be using it for commercial purposes. ShadowBox is free for personal use, but you have to buy a $20 license to use it for clients. As in, a one-time $20 fee to use as much as you want ($50 for a whole agency to use it, with multiple developers in-house). So please purchase the proper license; this plugin is awesome, and well worth it.
Google Analyticator
A nice-looking and functional website is great and all, but it’s sort of useless if you can’t tell how effective it is. The best way to follow a website’s effectiveness is to use Google Analytics. The easiest way to do this is by using the Google Analyticator plugin. From the author: “Google Analyticator adds the necessary JavaScript code to enable Google Analytics logging on any WordPress blog. This eliminates the need to edit your template code to begin logging. Google Analyticator also includes several widgets for displaying Analytics data in the admin and on your blog.”

Sounds pretty good to me. Price is right too – free. This guy is just as easy to implement as all the other quality WordPress plugins out there – however, if you have any issues, here’s a great FAQ.
There you go – 7 tips & tools to maximize WordPress as a CMS. Any that you find useful? Please share in the comments. Hopefully you found this post useful; if so, please spare a minute to retweet or vote this up on your network of choice below. I’d appreciate it!


